Flashing Against Existing Panel Siding

Pin On Diy And Crafts

Pin On Diy And Crafts

This Illustration Shows The Correct Way To Detail The Transition Between Dissimilar Cladding Types A Flas Exterior Cladding Cladding Installing Exterior Door

This Illustration Shows The Correct Way To Detail The Transition Between Dissimilar Cladding Types A Flas Exterior Cladding Cladding Installing Exterior Door

Pin On Metal Roofs

Pin On Metal Roofs

Pin On Arch Det Envelope

Pin On Arch Det Envelope

Gable Large Jpg 2 375 2 880 Pixels Attic Renovation Attic Flooring Attic Remodel

Gable Large Jpg 2 375 2 880 Pixels Attic Renovation Attic Flooring Attic Remodel

Pin On Chimney

Pin On Chimney

Pin On Chimney

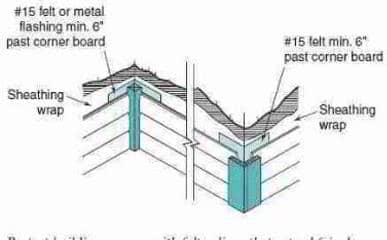
Using a metal j flashing between these types of transitions provides a barrier between siding and transitions that protects against water intrusion.

Flashing against existing panel siding.

However in most instances step flashing should be installed behind siding. It is always recommended to install step flashing behind stucco dryvit wood panel lap siding vinyl siding cedar shingle siding etc. Install the flashing before you finish the top of the brick wall as the flashing must go behind the siding as well as behind and under the top row of bricks that angle outward to cover the top. Unless you re careful step flashing can allow water from the roof to slip behind the gutter and get behind the siding and even the housewrap.

Since newer installation guidelines do not recommend caulking this joint but instead recommend leaving a small gap and flashing behind the ends of the siding i think it is more prudent to add flashings when it is possible to do so. Hold a panel at the correct height and against a window or other obstruction to mark for the horizontal part s of a cutout. A key part of my approach is using a special piece of flashing at this vulnerable intersection called kickout flashing or kickout diverter. In certain instances flashing may need to be installed on the exterior of siding.

If the shingle already has flashing on it the kickout flashing has to slip beneath it and you ll have to loosen or remove siding to do this. Flush the end of the flashing length with the wall corner and secure the flashing to the framing with an 8d nail at each wall stud. Again allow for a 1 4 inch gap. Measure over from the other panel to mark the top and bottom of the vertical cut and snap a line between the marks.

Install the kickout flashing underneath the first shingle photo 1. Cut 1 4 inch above the flashing or window. On a wall to be covered with wood cement board vinyl or metal.

Pin On New House Projects

Pin On New House Projects

Pin On Windows

Pin On Windows

Image Result For How To Trim Windows And Corners For Hardie Plank Siding Window Leaks Hardie Plank Hardy Plank Siding

Image Result For How To Trim Windows And Corners For Hardie Plank Siding Window Leaks Hardie Plank Hardy Plank Siding

Wood Siding Flashing Details At Joints Corners

Wood Siding Flashing Details At Joints Corners

Source : pinterest.com